Web Generate Record Cloning with Designer
Part 1
By Hervé Deschamps, Oracle Corporation.
One of the requirements
that keeps cropping up on just about every single application development
project is the ability to create a record from an existing one. In other
words, users like to bring up an existing record, modify a few things about
it and save it as a new record. This functionality provides great time
savings for them. In Oracle Forms, they would simply use <duplicate
record>. In WebServer modules generated by Designer 2.1.2. there is no
provision for this. This 2-part article will show you two techniques to
achieve this record cloning with Designer. These two methods differ fundamentally
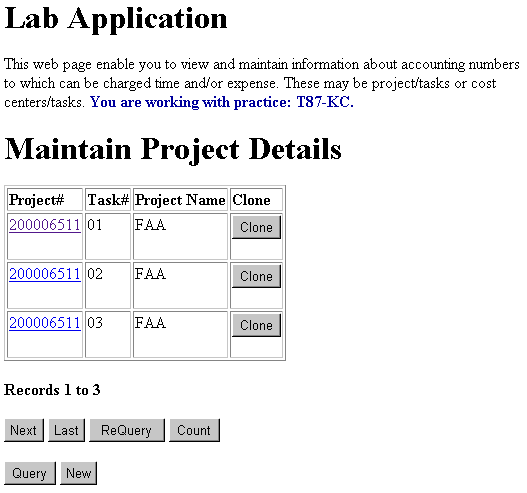
both in their look and feel and in their internal design. The table below
provide you with a visual comparison:
Method 1
|
Method 2
|
-
Figure 1
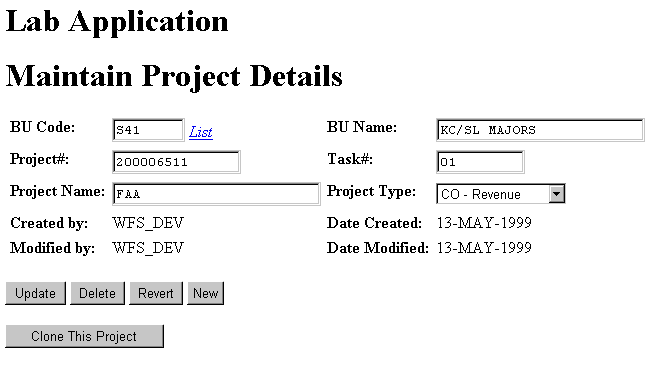 |
Figure 2
|
Method 1 is HTML and JavaScript
intensive, but requires no additional PL/SQL. Method 2 requires very little
HTML, no JavaScript and one PL/SQL procedure to be added to the module
definition. Method 2 also involves a PERL pre-compiler to automate modifications
to the PL/SQL code generated by Designer. This is a very powerful trick
that we will fully reveal in part 2 of this article.
We chose a simple form to illustrate
record cloning in order to make this article simpler and shorter. In the
real world, the typical module that requires cloning is usually composed
of many more fields than our simple project module. But this is good enough
to illustrate the principle.
Method 1: Using the View Form
This method is a 100% Designer
solution. It requires a fair amount of JavaScript coding but no PL/SQL
unless you need to clone more than just one record. We will show you how
include the following in Designer:
-
HTML code to create a button and
a few hidden fields to buffer data;
-
JavaScript to validate the data
on the web page before attempting the cloning;
-
More JavaScript code to transfer
data from visible fields to hidden text items.
If you are not an HTML expert or
a JavaScript guru, you will have no trouble understanding this article.
The code that we use is fairly basic and we explain the principal elements
in plain English.
The first and easiest step is
to assemble the HTML code required to create the clone button. We show
this
in Listing A.
-
Listing A
<FORM ACTION="seeLater" TARGET="_top" METHOD="POST">
<INPUT TYPE="button" VALUE="Clone This Project" onClick="cloneOnClick(this)">
</FORM>
-
HTML code to define the clone button.
This is a lot of code for a simple
button isn't it? And you haven't seen half of it yet. What we are trying
to do here is to submit a job to the web server when the user pushes a
button. We also want to send a bunch of data with the submission. This
requires the use of an HTML form. You can see the begin and end form tags
in listing A: <FORM> and </FORM>. In HTML the end tag is the same
as the begin tag with the addition of a forward slash. Target designates
the location where the web server's response should be displayed. _top
means: clear the current window and use it to display the response. Method
specifies the way parameter will be sent to the server. We advise you to
always set it to POST unless you have a good reason to do otherwise.
The HTML form contains one item
of type button. The label of the button is the text in the value property.
onClick is an event to which any button object will respond. More on this
later. The advanced reader will notice that we chose not to use the item
type SUBMIT. This is because we may not always want to submit the
HTML form when the user presses the clone button. More on this later.
When users press the clone button,
the browser runs the code specified against the onClick event. This event
provides us with a mechanism to implement form level validation that can
be operated inside the browser. Any business logic that can be performed
in the browser saves network traffic and provides user with immediate feedback.
Such logic can be programmed in JavaScript. A word of caution about this
language. It is young and still growing up. For example, there are inconsistencies
in the way certain commands work from browser to browser and from older
browser versions to newer ones. These differences have been ironed out
for core JavaScript constructs, that is why we recommend restricting yourself
to those, unless you are absolutely sure that all users will use a specific
browser version, forever. Some programmers prefer to minimize amount of
JavaScript and do all the validation in the server, using our mature and
stable PL/SQL. This will work but users generally prefer immediate feedback
(field level validation) and networks can only take so much traffic.
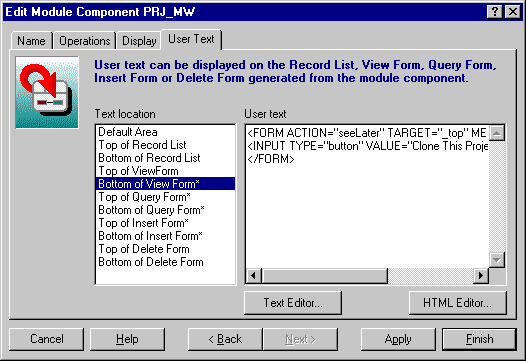
To include the HTML code from
Listing A into Designer, first choose the appropriate module component
in Design Editor. Most modules have only one. Double
click on it. A dialog pops up on the screen. The dialog title is "Edit
Module Component <module component name>". If you do not get this dialog
but see the property palette instead, select menu option: Options -> Use
Property Dialogs and double-click on the module component again. In the
User Text tab, select "Bottom of the View Form" and enter the code in Listing
A. Figure 2 shows you what you should see on your screen.
-
Figure 2
-
Setting up an extra button in Designer
Two side notes:
-
Make sure that the web generator
preference Set Text Handling->Substitute HTML Reserved Characters is set
to No. To do this, in Design Editor choose menu option Edit->Generator
Preferences.
-
In Figure 2, did you notice the
asterix at the end of some of the lines in the left panel? This indicates
the locations where some text was entered. The text entered in the other
locations is not relevant to this article. I am only revealing some of
my secrets...
Now that we have a button and that
we have a reasonable understanding of how HTML forms work, we need to figure
out how to insert a record, because this is what needs to happen when users
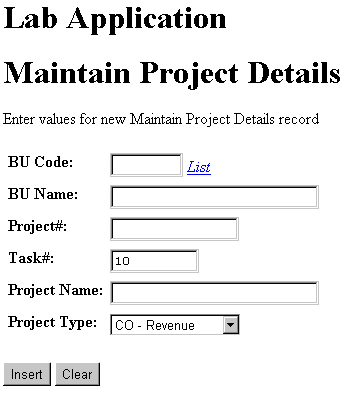
click on the clone button. Let's look at the insert HTML page illustrated
in figure 3.
-
Figure 3
-
Screen shot insert web page.
Figure 3 shows all the items that
are necessary to the creation of a new project. We need to take a look
at the code that lies behind the insert button and emulate it. Let's look
at the source HTML for this form. Right click on browser->view source.
Ignore the JavaScript code. Scroll all the way down to where a form is
defined. You should see something resembling Listing B.
-
Listing B
<FORM ACTION="prj_mw$prj_mw.actioninsert" METHOD="POST" NAME="frmZero">
<P>
<TABLE >
<TR VALIGN="TOP"><TD ALIGN="LEFT"><B>BU Code:</B></TD><TD
ALIGN="LEFT"><INPUT TYPE="text" NAME="P_L_BU_PC_CODE" SIZE="8" MAXLENGTH="10"
onChange="L_BU_PC_CODE_OnChange(this)">
<A href="javascript:L_BU_PC_CODE_LOV(document.forms[0].P_L_BU_PC_CODE)"><I>List</I></A></TD></TR>
<TR VALIGN="TOP"><TD ALIGN="LEFT"><B>BU Name:</B></TD><TD
ALIGN="LEFT"><INPUT TYPE="text" NAME="P_L_BU_BU_NAME" SIZE="25" MAXLENGTH="40"
onChange="L_BU_BU_NAME_OnChange(this)"></TD></TR>
<TR VALIGN="TOP"><TD ALIGN="LEFT"><B>Project#:</B></TD><TD
ALIGN="LEFT"><INPUT TYPE="text" NAME="P_PRJ_NBR" SIZE="15" MAXLENGTH="15"></TD></TR>
<TR VALIGN="TOP"><TD ALIGN="LEFT"><B>Task#:</B></TD><TD
ALIGN="LEFT"><INPUT TYPE="text" NAME="P_TASK_NBR" SIZE="10" MAXLENGTH="20"
VALUE="10"></TD></TR>
<TR VALIGN="TOP"><TD ALIGN="LEFT"><B>Project Name:</B></TD><TD
ALIGN="LEFT"><INPUT TYPE="text" NAME="P_NAME" SIZE="25" MAXLENGTH="40"></TD></TR>
<TR VALIGN="TOP"><TD ALIGN="LEFT"><B>Project Type:</B></TD><TD
ALIGN="LEFT"><SELECT NAME="P_PRJ_TYPE" SIZE="1"><OPTION VALUE="CI">CI
- Cost Relief<OPTION SELECTED VALUE="CO">CO - Revenue<OPTION VALUE="NB">NB
- Non Billable</SELECT></TD></TR>
</TABLE>
<P>
<INPUT type=hidden name="Z_ACTION">
<INPUT type=button value="Insert" onClick="this.form.Z_ACTION.value='INSERT';
btnIFI_OnClick(this)">
<INPUT TYPE="reset" VALUE="Clear">
<INPUT TYPE="hidden" NAME="Z_CHK" VALUE="0">
</FORM>
-
HTML form for inserting a project record.
As you can see, this is
a more elaborate form that contains a number of fields and a prompt for
each of them. Also, this form uses an HTML table for formatting purposes.
The content or value of each field marked as <INPUT TYPE="text" will
be passed as a parameter to the database procedure prj_mw$prj_mw.actioninsert
specified in the ACTION form property.
If this is getting a little
bit confusing, read on, I am about to close the loop. Here is a more readable
list of the named fields in that insert form:
-
Data Entry -- Visible
-
P_L_BU_PC_CODE
-
P_L_BU_BU_NAME
-
P_PRJ_NBR
-
P_TASK_NBR
-
P_NAME
-
P_PRJ_TYPE
-
Control -- Invisible
Now, let's look at the code of
procedure prj_mw$prj_mw.actioninsert so that you understand how its parameters
tie with the fields in the HTML form.
-
Listing C
procedure ActionInsert(
P_L_BU_PC_CODE in varchar2 default null,
P_L_BU_BU_NAME in varchar2 default null,
P_PRJ_NBR in varchar2 default null,
P_TASK_NBR in varchar2 default null,
P_NAME in varchar2 default null,
P_PRJ_TYPE in varchar2 default null,
Z_ACTION in varchar2 default null,
Z_DIRECT_CALL in boolean default false,
Z_CHK in varchar2 default null);
-
The PL/SQL procedure that performs the record insert.
As you can see, the names
of the HTML form items that contain information to be passed to the called
procedure must match the names of the parameters of the called procedure.
There is nothing more to it, it is that simple. The advanced reader may
have noticed that Z_DIRECT_CALL is not used in the browser. This non-defaulted
Boolean parameter cannot be defined in the parameter list of a URL. It
can only be used by another PL/SQL procedure. It makes it easier for procedures
to call each other. We will use it in our second method to implement cloning.
So, all our clone button needs
to do is gather the information necessary for an insert operation and call
ActionInsert with the right parameters. Let us add all those fields to
the HTML form that contains our cloning button.
Here is a technique to hasten
the creation of our clone form.
-
copy the HTML code from the insert
form;
-
remove the table formatting;
-
remove prompts;
-
remove LOVs;
-
remove the insert and clear buttons;
-
remove item sizes and maxlengths;
-
make all data items of type hidden
so that we don't confuse users with duplicate information.
We then fold these hidden fields
into the HTML form that we created earlier in module component->user text->bottom
of the view form. The end result is shown in Listing D.
-
Listing D
<FORM ACTION="prj_mw$prj_mw.actioninsert"
TARGET="_top" METHOD="POST">
<INPUT TYPE="hidden" NAME="P_L_BU_PC_CODE">
<INPUT TYPE="hidden" NAME="P_L_BU_BU_NAME">
<INPUT TYPE="hidden" NAME="P_PRJ_NBR">
<INPUT TYPE="hidden" NAME="P_TASK_NBR">
<INPUT TYPE="hidden" NAME="P_NAME">
<INPUT TYPE="hidden" NAME="P_PRJ_TYPE">
<INPUT TYPE="hidden" name="Z_ACTION"
VALUE="INSERT">
<INPUT TYPE="hidden" NAME="Z_CHK"
VALUE="0">
<INPUT TYPE="button" VALUE="Clone
This Project" onClick="cloneOnClick(this)">
</FORM>
-
Complete HTML form definition for cloning.
There is one last thing to take
care of before this cloning works. We need to write some JavaScript code
to populate the hidden fields composing our form. The mechanism for doing
so is to use the onClick event against our clone button to call a JavaScript
function that will copy data from the visible HTML form to the invisible
HTML form.
JavaScript identifies forms
with numbers. The first form gets number 0. The second form gets number
1. The form that was generated by Designer is called forms[0] in JavaScript.
Our custom form is forms[1]. As a side note, it is a very bad idea to position
a form before the one generated by Designer. The client validation code
generated by Designer refers to data fields as forms[0].<field_name>
instead of <form_name>.<field_name>. If one of your forms takes number
[0], the JavaScript code generated by Designer will produce runtime errors
or produce behavior anomalies.
Listing E shows the JavaScript
code that transfers data from forms[0] to forms[1]:
-
Listing E
<SCRIPT>
function cloneOnClick(ctl) { //ctl is not really used in called
function
// Make sure that all values entered pass client validation.
if (!PRJ_MW_Validate(ctl)) { return false; }
// Copy entered values in forms0 to hidden fields of forms1
document.forms[1].P_L_BU_PC_CODE.value = document.forms[0].P_L_BU_PC_CODE.value;
document.forms[1].P_L_BU_BU_NAME.value = document.forms[0].P_L_BU_BU_NAME.value;
document.forms[1].P_PRJ_NBR.value = document.forms[0].P_PRJ_NBR.value;
document.forms[1].P_TASK_NBR.value = document.forms[0].P_TASK_NBR.value;
document.forms[1].P_NAME.value = document.forms[0].P_NAME.value;
document.forms[1].P_PRJ_TYPE.value = document.forms[0].P_PRJ_TYPE.options[document.forms[0].P_PRJ_TYPE.selectedIndex].value;
document.forms[1].submit();
return true;
}
</SCRIPT>
-
JavaScript code of to transfer data before cloning.
Note that before copying
any information we call PRJ_MW_Validate. Designer generated this JavaScript
function. It performs client level validation. We must call it because
if any visible field contains erroneous data, we do not want to clone the
record.
How did we know that this validation
function existed and how did we know its name? Same method. We looked at
the source HTML code of the view form where we will add our cloning button.
Logically, any validation code had to be triggered by the onClick event
of the update button. Here is the HTML definition of this button in listing
F.
-
Listing F
<INPUT type=button value="Update" onClick="this.form.Z_ACTION.value='UPDATE';
btnVFU_OnClick(this)">
-
HTML definition of the update button. Calls form level validation.
Look at the event code for
the update button. It calls JavaScript function btnVFU_OnClick(this). We
then scrolled up the web page source code to find out what this function
did. See listing G.
-
Listing G
function btnVFU_OnClick(ctl) {
if (!PRJ_MW_Validate(ctl)) { return false; }
document.forms[0].submit();
return true;
}
-
JavaScript validation code as generated by Designer.
There you have it: the update
will be submitted to the server only if the validation function PRJ_MW_Validate
returns true. So we did the same in Listing E.
You may note that copying data
from text fields is relatively simple. However when the data source is
a radio button or an option list, the JavaScript code becomes a little
bit more involved. In our projects web module we have one option list item:
project_type. Take a look at the JavaScript code involved. We cannot show
everything in this article but you will find the information in a good
JavaScript reference book, a must have.
All we have to do to complete
our cloning is to insert our function cloneOnClick before the button definition
in component->user text->bottom of the view form and generate the form.
From the record list, the user
can view the details of one specific record by clicking on it. This brings
up the queryview page in the browser as Figure 4 illustrates.
-
Figure 4

-
View form where users can clone records.
From this page users can update,
delete, clone the record or they can create a new record from scratch.
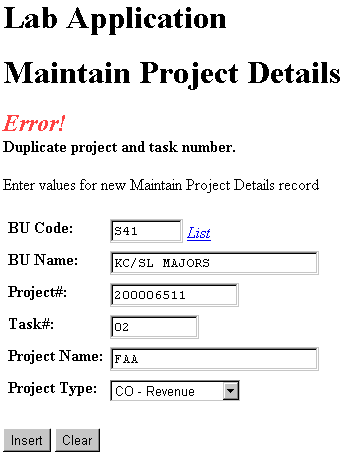
If they clone the record, they must modify at least one of project number
or task number as there is a unique key defined on these two columns. If
they forget to do so, they get the error illustrated in figure 5.
-
Figure 5
-
Cloning records violating Unique
Key constraint.
Note that this error is produced
by the server. We can improve this by checking in the browser that the
users change at least one of the project number or the task number.
Looking at the source code
of the queryview form, we noticed that Designer created hidden items that
contain the old values of the two fields:
<INPUT TYPE="hidden" NAME="O_PRJ_NBR"
VALUE="300006511">
<INPUT TYPE="hidden" NAME="O_TASK_NBR"
VALUE="01">
We can write a JavaScript function
that checks that users change one of the 2 fields in the HTML form before
clicking on the clone button. We placed the JavaScript code of this function
in listing H.
-
Listing H
function PRJ_MW_UKCol_changed () {
if (document.forms[0].P_PRJ_NBR.value == document.forms[0].O_PRJ_NBR.value
&&
document.forms[0].P_TASK_NBR.value ==
document.forms[0].O_TASK_NBR.value) {
alert("When you clone a project task, you must enter
a new project# and/or task#.");
return false;
}
return true;
}
-
JavaScript function that checks that users change some data
before cloning.
PRJ_MW_UKCol_changed returns true
if one of the 2 fields changed, false otherwise. It also displays an error
message before returning false. Figure 6 illustrates the error message
appearing in a popup box.
-
Figure 6

-
JavaScript error message from client
validation.
The attentive reader may
rightly object to this excessively simplistic validation. It does not prevent
the error illustrated in Figure 5 from occurring. It cannot. JavaScript
code can only work with the information contained in the browser. It cannot
capture all possible errors. Only PL/SQL code can do that. So why use JavaScript
validation? Two very solid reasons: to provide immediate feedback to the
users when we can and to reduce network traffic.
Once function PRJ_MW_UKCol_changed
created, we need to call it from function cloneOnClick(ctl). In Listing
I we recapitulate the complete JavaScript code to be included in Designer
in module component->user text->bottom of the view form:
-
Listing I
<SCRIPT>
function PRJ_MW_UKCol_changed () {
if (document.forms[0].P_PRJ_NBR.value == document.forms[0].O_PRJ_NBR.value
&&
document.forms[0].P_TASK_NBR.value ==
document.forms[0].O_TASK_NBR.value) {
alert("When you clone a project task, you must enter
a new project# and/or task#.");
return false;
}
return true;
}
function cloneOnClick(ctl) { //ctl is not really used in called
function
// Make sure that all values entered pass client validation.
if (!PRJ_MW_Validate(ctl)) { return false; }
if (!PRJ_MW_UKCol_changed()) { return false; }
// Copy entered values in form0 to hidden fields of forms1
document.forms[1].P_L_BU_PC_CODE.value = document.forms[0].P_L_BU_PC_CODE.value;
document.forms[1].P_L_BU_BU_NAME.value = document.forms[0].P_L_BU_BU_NAME.value;
document.forms[1].P_PRJ_NBR.value = document.forms[0].P_PRJ_NBR.value;
document.forms[1].P_TASK_NBR.value = document.forms[0].P_TASK_NBR.value;
document.forms[1].P_NAME.value = document.forms[0].P_NAME.value;
document.forms[1].P_PRJ_TYPE.value = document.forms[0].P_PRJ_TYPE.options[document.forms[0].P_PRJ_TYPE.selectedIndex].value;
document.forms[1].submit();
return true;
}
</SCRIPT>
<FORM ACTION="prj_mw$prj_mw.actioninsert" TARGET="_top" METHOD="POST">
<INPUT TYPE="hidden" NAME="P_L_BU_PC_CODE">
<INPUT TYPE="hidden" NAME="P_L_BU_BU_NAME">
<INPUT TYPE="hidden" NAME="P_PRJ_NBR">
<INPUT TYPE="hidden" NAME="P_TASK_NBR">
<INPUT TYPE="hidden" NAME="P_NAME">
<INPUT TYPE="hidden" NAME="P_PRJ_TYPE">
<INPUT TYPE="hidden" name="Z_ACTION" VALUE="INSERT">
<INPUT TYPE="hidden" NAME="Z_CHK" VALUE="0">
<INPUT TYPE="button" VALUE="Clone This Project" onClick="cloneOnClick(this)">
</FORM>
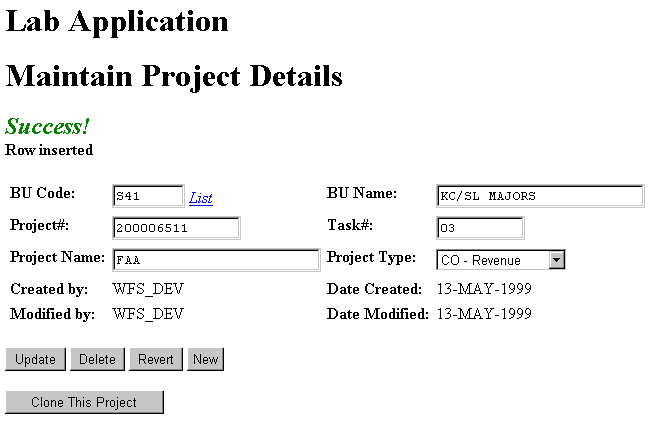
Figure 7 shows the web
page produced by when users clone a record successfully.
-
Figure 7
-
Successful cloning.
In order to explain this cloning
technique, we used a straightforward example. If you recall Listing B,
all the cloning button does is call procedure prj_mw$prj_mw.actioninsert
that was generated by Designer. Because business requirements are not always
as simple as the example we showed in this article, it is not always sufficient
to make a direct call to a Designer generated procedure and get away with
no extra PL/SQL coding. A typical example of this is when cloning is applied
to a purchase order header and all the order lines need to be cloned in
the process. What you need to do then is create your own procedure in the
module definition. You can either place it at the module level (module
-> application logic -> named routines) or at the module component level
(module component -> application logic -> named routines) . This procedure
can have as many parameters as you need. In this article we showed you
how to get data in the browser and pass it down to the server. Your procedure
can do direct dml operations on the tables because the table triggers call
the table API. After your dml, you can make a direct call to one of the
Designer procedures, like prj_mw$prj_mw.queryview to display the
new record with Z_DIRECT_CALL=>TRUE. If you added business logic to module
events like pre-insert, you may need to make sure that cloning applies
the same logic. We will explain a lot more about creating and calling your
own procedures from a web page in part 2 of this article.
Hervé Deschamps is a Senior Principal Consultant
with Oracle Corporation. He has had over five years of experience with
Oracle Development Environments (Designer, Developer and previous versions).
He has an extensive experience of all phases of the development life cycle
with a focus in the areas of business analysis, data modeling and database
design. He is also known in the technical community for his article publications
centered around best custom development practices and for his user group
presentations. You can reach him by e-mail at hdescham@us.oracle.com. He
also maintains a web site full of articles, scripts, tips and techniques
at http://www.iherve.com.


