Web Generate Mass Updates with Designer
By Hervé Deschamps, Oracle Corporation.
This article presents a solution to yet another one of these problems that
keeps cropping up on just about every single application development project.
Very often users ask for the ability to apply the same update to a larger
number of records with one mouse click.
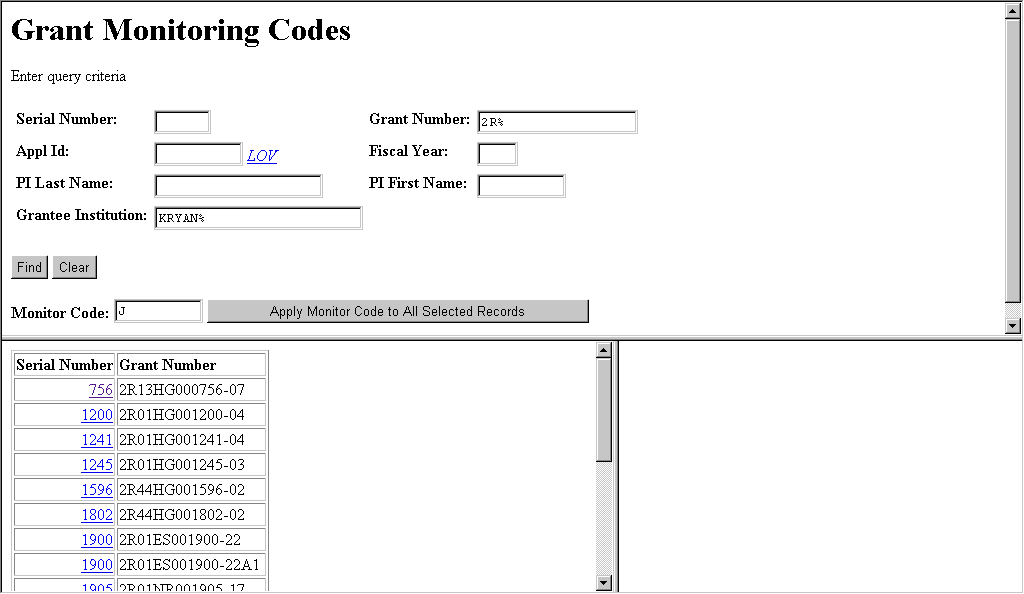
Figure 1 illustrates what you can get Designer to generate for you.
The web page is composed of three frames. Users can select a number of
records using the module's query criteria displayed in the top frame and
pressing the find button. The records that match that criteria are displayed
in the bottom left frame. The bottom right frame is used to display the
details of a specific record within the list.
-
Figure 1
-
Illustrates the end result that we want to achieve.
So far, this is all straightforward Designer functionality. The real
value of this article lies in the technique demonstrated to add the items
displayed below the button Find and Clear. When users type a value for
Monitor Code and click on the button 'Apply Monitor Code to All Selected
Records', all records selected by the query criteria in the top frame will
get updated with the new monitor code and a feedback message will be displayed
on a new web page.
Step 1: Getting the basic module design.
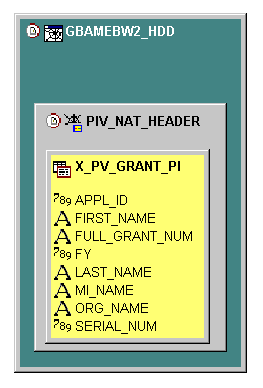
The module illustrated in Figure 1 is a simple one table usage module.
Figure 2 shows the module data diagram of our module.
-
Figure 2
-
Module Data Diagram of the module shown in Figure 1.
Step 2: Getting the frame structure required.
Users need to be able to see both the query criteria and the record list
on the same web page so that they can quickly get the list of records desired.
So we need to get Designer to generate frames. In Design Editor, double
click on the module component. Ours is called PIV_NAT_HEADER. A dialog
pops up on the screen. The dialog title is "Edit Module Component <module
component name>". If you do not get this dialog but see the property palette
instead, select menu option: Options -> Use Property Dialogs and double-click
on the module component again. Choose tab Display, pick layout style List/Form.
Also in Design Editor, select the module, right-click on it and bring
up the Generator Preferences. Expand the Frames preferences and set 'Place
Query Form on Separate Page' to No.
At this point, if we generate the module we get the layout illustrated
in Figure 1, except the monitor code and the apply button.
Step 3: Adding one or more extra fields and a button to the
query frame.
One would think that it is possible to use unbound items for this. Unbound
items are custom items that are not based on a table column in the database,
like a button or a derivation expression. Well, Designer 2.1.2. does not
allow us to create unbound items of type Button for web modules yet. The
only available display types are: Check Box, Image, Pop List, Radio Group,
Text and Text List. Also, if you try to include an unbound text item in
the query form, it will work until you type a value in the unbound field
at runtime. This is the type of error message that you'll get:
Error!
The following unhandled error has occurred in the routine
gbamebw2_hdd$piv_nat_header.QueryHits:
ORA-00936: missing expression
This is because of the way WSGL.BuildWhere is used. WSGL is a package
provided by the Designer development team. Some people dare to modify that
package. We don't. We prefer to find other ways.
Here is a technique to add a text item with prompt and a button. This
one always works. In the Design Editor double-click on the module component.
Select the tab User Text. Click on Bottom of query form. Click on the Text
Editor button. Listing A shows what we type in the editor for our first
shot at getting the 3 items shown in Figure 1 displayed on our web page.
-
Listing A
<FORM ACTION="gbamebw2_hdd$piv_nat_header.apply_monitor" METHOD="POST"
TARGET="_top">
<B>Monitor Code: </B><INPUT TYPE="text" NAME="P_MONITOR_CODE"
SIZE="10">
<input type="button" value="Apply Monitor Code to All Selected
Records">
</FORM>
-
HTML code to define the basic elements of the mass update.
This is a lot of code for a text item and a button isn't it? And you haven't
seen half of it yet. What we are trying to do here is to submit a job to
the web server when the user pushes a button. We also want to send a bunch
of parameters with the submission. This requires the use of an HTML form.
You can see the begin and end form tags in listing A: <FORM> and </FORM>.
In HTML the end tag is the same as the begin tag with the addition of a
forward slash. Target designates the location where the web server's response
should be displayed. _top means: clear the current window and use it to
display the response. Method specifies the way parameter will be sent to
the server. We advise you to always set it to POST unless you have a good
reason to do otherwise.
Ignore the Forms Action for now. We will explain this later.
The first line of HTML code in Listing A defines the text field and
its prompt. The next line defines the button. The label of the button is
the text in the value property. The advanced reader will notice that we
chose not to use the item type SUBMIT. This is because we may not
always want to submit the HTML form when users press the apply button.
More on this later.
To include the HTML code from Listing A into Designer, first choose
the appropriate module component in Design Editor. Most modules have only
one. Double click on it. A dialog pops up on the screen. The dialog title
is "Edit Module Component <module component name>". If you do not get
this dialog but see the property palette instead, select menu option: Options
-> Use Property Dialogs and double-click on the module component again.
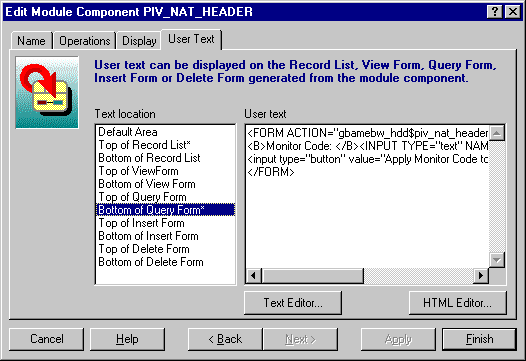
In the User Text tab, select "Bottom of the Query Form" and enter the code
in Listing A. Figure 3 shows you what you should see on the screen.
-
Figure 3
-
Setting up an extra text field and button in Designer
Two side notes:
-
Make sure that the web generator preference Set Text Handling->Substitute
HTML Reserved Characters is set to No. To do this, in Design Editor choose
menu option Edit->Generator Preferences.
-
In Figure 3, did you notice the asterisk at the end of some of the lines
in the left panel? This indicates the locations where some text was entered.
The text entered in the other locations is not relevant to this article.
I cannot reveal all of my secrets...
Also note that at this point you have free hand to make the layout look
as pretty as HTML will let you. You are no longer constrained by Designer.
Step 4: Testing the layout.
At this point, we can generate the module and bring it up in the browser.
We get the same layout as Figure 1 illustrates. But when we click on the
apply button, nothing happens. How do we change this? Next step.
Step 5: Getting the Apply Button to do something.
In order for something to happen when users click on the apply button we
need to add an event on the button. The code for this is shown in listing
B. It is a modification of the code shown in Listing A.
When users press the apply button, the browser runs the code specified
against the onClick event. This event provides us with a mechanism to implement
form level validation or derivation that can be operated inside the browser.
Any business logic that can be performed in the browser saves network traffic
and provides user with immediate feedback. Such logic can be programmed
in JavaScript. A word of caution about this language. It is young and still
growing up. For example, there are inconsistencies in the way certain commands
work from browser to browser and from older browser versions to newer ones.
These differences have been ironed out for core JavaScript constructs,
that is why we recommend restricting yourself to those, unless you are
absolutely sure that all users of your system will use a specific browser
version, forever. Some programmers prefer to minimize the amount of JavaScript
and do all the validation in the server, using our mature and stable PL/SQL.
This will work but users generally prefer immediate feedback (field level
validation) and networks can only take so much traffic.
In Listing B the onClick event calls JavaScript function monitorOnClick
that we have still to write. More on this later.
-
Listing B
<FORM ACTION="gbamebw2_hdd$piv_nat_header.apply_monitor" METHOD="POST"
TARGET="_top">
<INPUT TYPE="hidden" NAME="P_SERIAL_NUM">
<INPUT TYPE="hidden" NAME="P_FULL_GRANT_NUM">
<INPUT TYPE="hidden" NAME="P_APPL_ID">
<INPUT TYPE="hidden" NAME="P_FY">
<INPUT TYPE="hidden" NAME="P_LAST_NAME">
<INPUT TYPE="hidden" NAME="P_FIRST_NAME">
<INPUT TYPE="hidden" NAME="P_ORG_NAME">
<B>Monitor Code: </B><INPUT TYPE="text" NAME="P_MONITOR_CODE"
SIZE="10">
<input type="button" value="Apply Monitor Code to All Selected
Records" onClick="monitorOnClick(this)">
</FORM>
-
Complete HTML code to define the basic elements of the
mass update.
Step 6: Passing parameters to the mass update procedure.
Looking at listing B you have probably guessed that the mass update is
performed by the packaged procedure gbamebw2_hdd$piv_nat_header.apply_monitor
that we will write very soon. apply_monitor will issue a simple update
statement. It will change the monitor code of all the records that match
the query criteria specified in the top frame of the web page. In this
step we show how to pass the query criteria and the monitor code to apply_monitor
as parameters.
Listing B has all the code that we need. All parameters to be passed
down to apply_monitor have to be declared as input items in our HTML form.
The monitor code was already defined in Listing A. We added the query criteria
items as hidden fields. These fields were already defined in the HTML form
generated by Designer. We need to duplicate them in our HTML form, so we
create them as hidden items in order not to confuse the users with duplicate
information
We also need to write some JavaScript code to populate the hidden fields
composing our form. The mechanism for doing so is to use the onClick event
against our apply button to call a JavaScript function that will copy data
from the visible HTML items to their invisible counterparts. We mentioned
this function already: monitorOnClick.
JavaScript identifies forms with numbers. The first form gets number
0. The second form gets number 1. The form that was generated by Designer
is called forms[0] in JavaScript. Our custom form is forms[1]. As a side
note, it is a very bad idea to position a form before the one generated
by Designer. The client validation code generated by Designer refers to
data fields as forms[0].<field_name> instead of <form_name>.<field_name>.
If one of your forms takes number [0], the JavaScript code generated by
Designer will produce runtime errors or produce behavior anomalies.
Listing C shows the JavaScript code that transfers data from forms[0]
to forms[1] and then submits our HTML form. We placed this code in front
of the code shown in Listing B.
-
Listing C
<SCRIPT>
function monitorOnClick(ctl) { //ctl is not really used in called
function
// Copy entered values in forms0 to hidden fields of forms1
document.forms[1].P_SERIAL_NUM.value = document.forms[0].P_SERIAL_NUM.value;
document.forms[1].P_FULL_GRANT_NUM.value = document.forms[0].P_FULL_GRANT_NUM.value;
document.forms[1].P_APPL_ID.value = document.forms[0].P_APPL_ID.value;
document.forms[1].P_FY.value = document.forms[0].P_FY.value;
document.forms[1].P_LAST_NAME.value = document.forms[0].P_LAST_NAME.value;
document.forms[1].P_FIRST_NAME.value = document.forms[0].P_FIRST_NAME.value;
document.forms[1].P_ORG_NAME.value = document.forms[0].P_ORG_NAME.value;
document.forms[1].submit();
return true;
}
</SCRIPT>
-
JavaScript code of to transfer data before running the mass
update.
-
You may want to add more code to this JavaScript function to make the web
page more user friendly. For example it would be wise to ensure that
users do not press the apply button without a query criteria. This would
update the entire table!
Step 7: Testing the module.
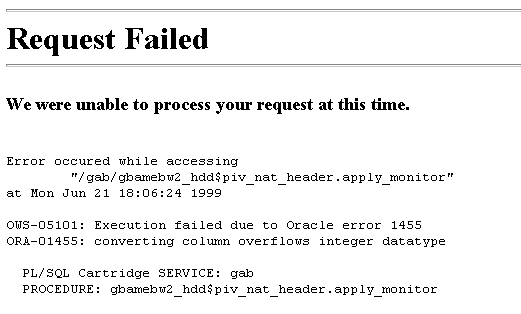
At this point if we generate the module and click on the apply button,
something does happen. We get the error message displayed in Figure 4
-
Figure 4
-
Normal error message: need to do a bit PL/SQL coding.
When submitted, our HTML form calls procedure gbamebw2_hdd$piv_nat_header.apply_monitor.
We have yet to create it.
Step 8 (Last): Creating the mass update procedure.
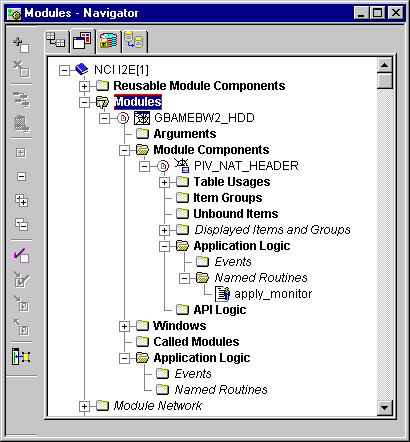
The last thing we need to do is create the procedure apply_monitor in Designer.
Figure 5 shows where we defined it in the Navigator.
-
Figure 5
-
Illustrates where to place custom PL/SQL in Designer.
We are now into familiar territory: PL/SQL programming. Listing
D shows and example of what you may want to do with the parameters passed.
You will probably need more elaborate logic than the one we present here.
For example there may be state transition business rules on the monitor
code. That is it may not be permitted for the monitor code to change from
one value to another. In that case you will have to use a cursor and accept
or reject record updates. If you reject some updates you need to decide
whether you reject the entire mass update or proceed with the update of
records that do not violate any business rules.
Once all this is decided and coded, you will need to report the results
to the user. Again, you will probably decide to provide something more
elaborate than our 2 htp.p statements in Listing D. In this article we
limit ourselves to a proof of concept.
-
Listing D
PROCEDURE apply_monitor (
P_SERIAL_NUM IN VARCHAR2,
P_FULL_GRANT_NUM IN VARCHAR2,
P_APPL_ID IN VARCHAR2,
P_FY IN VARCHAR2,
P_LAST_NAME IN VARCHAR2,
P_FIRST_NAME IN VARCHAR2,
P_ORG_NAME IN VARCHAR2,
P_MONITOR_CODE IN VARCHAR2
) IS
BEGIN
UPDATE appl_gab_monitor_codes_t age
SET age.gme_code = P_MONITOR_CODE
WHERE age.appl_id IN (
SELECT piv.appl_id
FROM x_pv_grant_pi piv
WHERE (piv.full_grant_num LIKE NVL(P_FULL_GRANT_NUM,'%')
OR (P_FULL_GRANT_NUM IS NULL AND piv.full_grant_num IS NULL)) AND
(piv.serial_num LIKE NVL(P_SERIAL_NUM,'%')
OR (P_SERIAL_NUM IS NULL AND piv.serial_num IS NULL))AND
(piv.appl_id LIKE NVL(P_APPL_ID,'%'))
AND
(piv.fy LIKE NVL(P_FY,'%')
OR (P_FY IS NULL AND piv.fy IS NULL)) AND
(piv.last_name LIKE NVL(P_LAST_NAME,'%')
OR (P_LAST_NAME IS NULL AND piv.last_name IS NULL)) AND
(piv.first_name LIKE NVL(P_FIRST_NAME,'%')
OR (P_FIRST_NAME IS NULL AND piv.first_name IS NULL)) AND
(piv.org_name LIKE NVL(P_ORG_NAME,'%')
OR (P_ORG_NAME IS NULL AND piv.org_name IS NULL))
);
COMMIT;
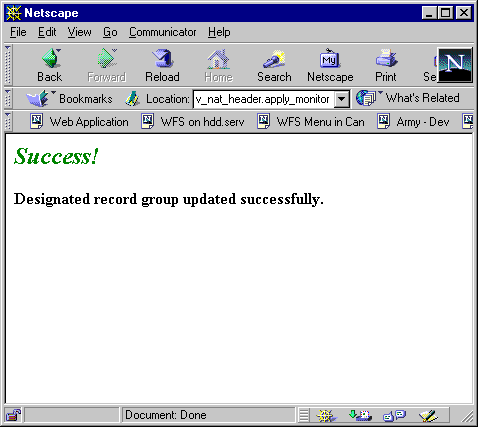
htp.p('<B><font color="008000" size=+2><I>Success!</I></font>');
htp.para;
htp.p('Designated record group updated successfully.');
END;
-
JavaScript code of to transfer data before running the mass
update.
-
Figure 6
-
Feedback message from the mass update.
Room for improvement:
In this article we have really focused our effort on one technique
to provide mass update to users: selection by query criteria. Most of the
time users will ask for the ability to further refine the selection by
checking or unchecking the records listed in the lower left frame in Figure
1. In order to provide this kind of functionality you would have to either
use the pre-compiler created by the author or perform manual modifications
to the code generated by Designer. Users may also request the ability designate
manually a number of records to be updated by typing their ID code when
they know them. That you can do with Designer only by using a technique
similar to that shown in this article.
We could also have added a list of value against the monitor code in
Figure 1. We will show how to add a list of value against such unbound
item in a future article.
Hervé Deschamps is a Senior Principal Consultant
with Oracle Corporation. He has had over five years of experience with
Oracle Development Environments (Designer, Developer and previous versions).
He has an extensive experience of all phases of the development life cycle
with a focus in the areas of business analysis, data modeling and database
design. He is also known in the technical community for his article publications
centered around best custom development practices and for his user group
presentations. You can reach him by e-mail at hdescham@us.oracle.com. He
also maintains a web site full of articles, scripts, tips and techniques
at http://www.iherve.com.


