Web Generate Powerful Navigation with Designer 2.1.2

By Hervé Deschamps, Oracle Corporation.


However new the technologies, we developers have to resolve the same old problems to keep our users and customers happy. Granted, some new challenges make our lives more interesting. However, the same basic issues have to be resolved in order to provide decent systems.

What do users expect from a good information system? Well, as the name suggests, such system should provide a very efficient and flexible access to information. Different users will focus on distinct areas of the database and follow diverse paths to navigate to the same information.

In this article we focus on navigation. We show how to use the PL/SQL Package List preference to give you a free hand to include navigation buttons that call other web server modules and pass parameters containing context information.

To help the reader we move step by step through the process to provide such navigation to users. Process steps are illustrated with snapshots of the web modules, key Designer settings together with PL/SQL and JavaScript code extracts.


The overall picture

Figure A illustrates the data structure behind what we are trying to achieve. In our system we manage employees, positions and business units. Wfs_positions is an intersection table between employees and business units: overtime an employee can be assigned a number of positions in a number of business units.
 
Figure A
Module Data Diagram of the calling module.


In one module we enable users to view, create, update and delete positions. In another module we provide the same functionality for business units. Our objective is to get Designer to generate code to display a button on the web page that handles positions. When the user clicks on this button the system must display the web page that manages business unit information and automatically bring up the record of the business unit corresponding to the position that the user was looking at.


The calling module

Figure B illustrates the web module that enables users to maintain information about employee positions. It is on this web page that we wish to add a button that will bring up the business unit details.
 
Figure B
Screen shot of the calling module.


The called module

Figure C illustrates the key part of this technique: the called module. We will study its composition so that you understand how to develop techniques similar to the one presented in this article.
 
Figure C
Screen shot of the called module.


Now, how do we figure out how to call this module with parameters and make it display one or several specific records?
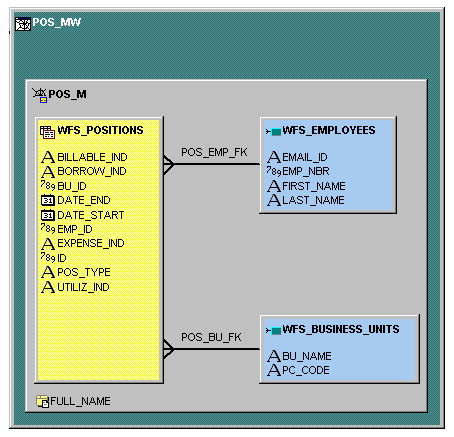


The Thought Process

First, let us examine the structure of the code generated by Designer for the called module. At this stage, this should already be generated. You will find the files containing the code in the directory set in the WebServer Generator Options dialog. When you navigate to this directory you will probably find a large number of files. The WebServer generator produces one package per module and one package for each module component. Each module is defined by 3 files. The .pks file contains the package header definitions. The .pkb file contains the package body definitions. The .sql file calls the 2 files previously mentioned. The file names follow this rule: "Cvw"+<module short name>.<file type>. The short name of the called module presented in this article is bu_mw. The files corresponding to this module are Cvwbu_mw.pks, Cvwbu_mw.pkb and Cvwbu_mw.sql.

Listing A outlines the structure of the called module. We will need to call one of its program units when users click on our navigation button. Can you guess which one we’ll pick?
 

Listing A


procedure Startup Entry point for the 'BU_M' module.
procedure ActionQuery Handles a query request.
procedure TextFrme Sets up the frames that compose the web page.
procedure FormQuery Builds an HTML form for entry of the query criteria.
procedure FormInsert Builds an HTML form to insert records in the database.
procedure QueryView Queries the details of a single row in preparation for display.
procedure QueryList Builds the Record list for the module component.
procedure QueryFirst Finds the first row which matches the given search criteria and calls QueryView.
function QueryHits Returns the number or rows which matches the given search criteria.
procedure ActionView Processes update, delete or requery requests from the view form.
procedure ActionInsert Processes requests from the insert form.
procedure ActionDelete Processes confirmed delete requests.

Program units composing the package that implements the called module.


With this structure in mind, the next step is easy. Designer has already coded a parameterized procedure that queries the database and displays the business unit details. This procedure is ActionQuery. In Listing B we show the header of this procedure in the called module package.
 

Listing B


procedure ActionQuery(
P_PC_CODE in varchar2,
P_CC_CODE in varchar2,
P_NAME in varchar2,
P_CTRY_NAME in varchar2,
Z_DIRECT_CALL in boolean default false,
Z_ACTION in varchar2,
Z_CHK in varchar2) is
[…]

Query procedure generated by Designer.


This is the procedure that is called in the business unit module when the user submits the query HTML form by pressing the Find button. So all we have to do is get Designer to generate such an HTML form in the calling module.


Create an HTML Form

The only visible item of our HTML form is the button that will kick off the call. We need to add invisible items to this form: one for each parameter that we pass. How do we do all this?

First, we need to use the PL/SQL Package List preference. You can get Designer to include any HTML or JavaScript code in the module that it generates by creating a package of functions that return varchar2. All you have to do is put the package name in the PL/SQL Package List preference and include the calls to your functions in the "right places" in the module definition. The "right places" are usually user text areas, titles, headers and footers.

We set the web generator preference Text Handling à PL/SQL Package List = wfs_weblib. Wfs_weblib is the package where we put all the custom client code that we need the generator to include. This package must be created on the database server.

Then in the Design Editor, we navigate to the calling module: pos_mw and double click on its module component pos_m. A dialog pops up on the screen. The dialog title is "Edit Module Component <module component name>". If you do not get this dialog but see the property palette instead, select menu option: Optionsà Use Property Dialogs and double-click on the module component again. In the User Text tab we select "Bottom of the View Form" and type this in the User text: "wfs_weblib.pos_m_but_bu". Note1: do not include the quotes. Note2: no semi-column is required. The attentive reader will recognize the package name that we introduced earlier. The function code of pos_m_but_bu is in Listing C.
 

Listing C


create or replace package wfs_weblib as
function pos_m_but_bu return varchar2;
end wfs_weblib;
/
create or replace package body wfs_weblib as
function pos_m_but_bu return varchar2 is
begin
return ('<form action="wfs_weblib.call_bu_m" METHOD="POST" TARGET="_top" NAME="frmOne">'||
'<input type=hidden name="P_PC_CODE">'||
'<input type="submit" value="Show PC Details" onClick="this.form.P_PC_CODE.value=document.forms[0].P_L_BU_PC_CODE.value;return true">'||
'</form>');
end;
end wfs_weblib;
/

The function that creates the button in the calling module.


This function returns a piece of HTML and JavaScript code. The code creates a form with 2 elements: a button with label "Show PC Details" and a hidden text field that gets populated by the code in the onClick trigger of the button item. When you see a statement like "this.form.P_PC_CODE.value=document.forms[0].P_L_BU_PC_CODE.value " you may wonder how you would know the exact spelling of the fields in your own modules. With experience you can guess. If you lack the experience, here is a technique for you. Generate your module once without the button. When you have achieved the design that you intended, check the source HTML in your browser. This will show all the items and their HTML names.

If you have analyzed thoroughly the code in Listing C, you know what server procedure gets called when the user presses the button: wfs_weblib.call_bu_m. Creating this procedure is the last step of this technique. If you are not an HTML expert, you may be surprised that you did not see an explicit call to this procedure in the onClick trigger of the button. This is what an HTML form does. It contains a number of items, some text fields, some hidden fields and some submit items. Our button is a submit item. When users select submit items, the instructions in the "action" property of the HTML form are executed. This is how wfs_weblib.call_bu_m is executed.


The Calling Procedure

In Listing D we reveal the big secret. The calling procedure accepts one parameter that we pass as '<input type=hidden name="P_PC_CODE"> in Listing C. This parameter is then passed on to the procedure generated by Designer: bu_mw$bu_m.ActionQuery. Another important parameter needs to be set: z_direct_call = true. This parameter is used by Designer if you set preference "Enforce URL checksums (SECECS) to Yes". The idea behind this preference is to prevent users from being able to modify URLs to obtain access to records that they are not authorized to view and/or modify. Setting z_direct_call to true bypasses that security. We found this acceptable because no information showed by the called module is sensitive. When security is an issue, we do not set z_direct_call to true and we pass a checksum that is verified by the called procedure.
 
Listing D


create or replace package wfs_weblib as
procedure call_bu_m (p_pc_code in varchar2);
end wfs_weblib;
/
create or replace package body wfs_weblib as
procedure call_bu_m (p_pc_code in varchar2) is
begin
bu_mw$bu_m.ActionQuery(
p_pc_code => p_pc_code,
z_direct_call=> true);
end;
end wfs_weblib;
/

The procedure that calls another module and passes context information.


Important Note: our package wfs_weblib is not as small as listing D suggests. We only show extracts of it for the sake of brevity. For this reason we did not repeat the code shown in Listing C into Listing D, although it is the same package.
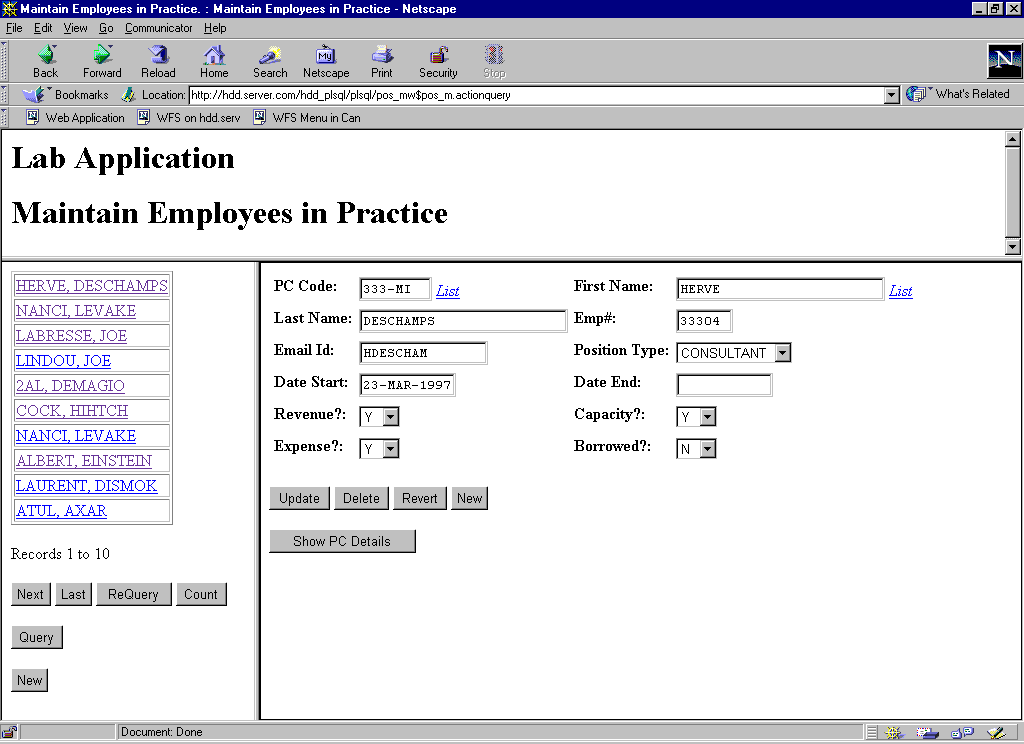
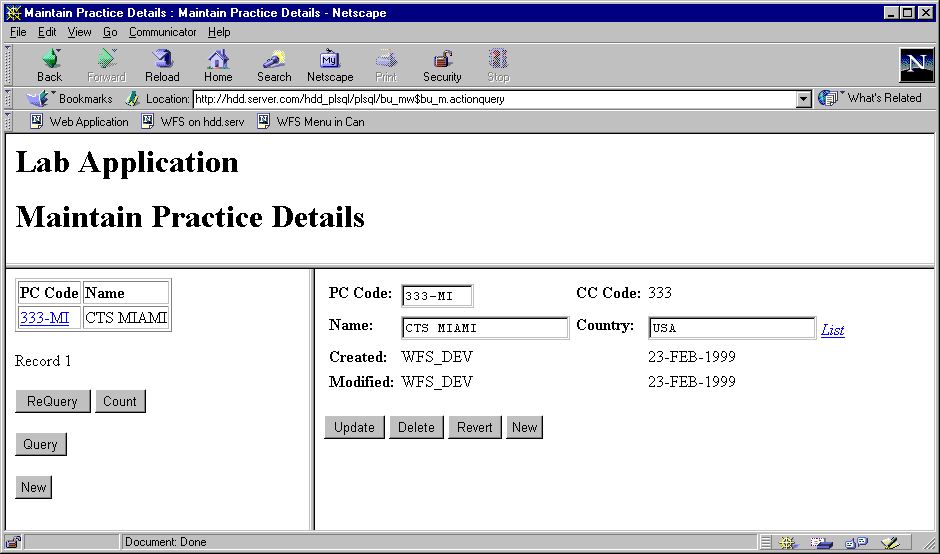
 

Make it all work

We have described all the pieces. All that is left to do is compile our package wfs_weblib and generate the calling module. PL/SQL compilation errors are usually easy to identify and fix. It gets tougher when the compilation is successful but the browser does not display the expected information in the called module. If you get a JavaScript error in the status line of your browser, you are in good shape. If you use Netscape, all you need to do is type "JavaScript:" in the URL field of the browser to get more details. If you do not get any error but the called module does not react to the context, you have to debug your code. The JavaScript Alert() method comes in handy for that.
 
Figure D
Calling module successfully generated.


In our situation, when in Figure D the user presses on the button "Show PC Detail" the information illustrated in Figure C is displayed. Note that there is only one record in the record list in the left frame in Figure C. This record corresponds to the PC Code assigned to the employee in Figure D.


Last Note

This technique is very powerful for two reasons. First, it makes navigation extremely easy for the users: buttons are intuitive and appear when they are relevant. Second, users no longer have to take note of what records they were looking at before they called another module, then query the database accordingly. The system can make a very good guess based on the context and let users do something else if they want.

Giving users an easy access to information is what information systems are all about.

Hervé Deschamps is a Senior Principal Consultant with Oracle Corporation. He has had over five years of experience with Oracle Development Environments (Designer, Developer 2000 and their previous versions). He specialises in tending towards 100% Generation using Designer for both web and client server applications. You can reach him by e-mail at herve@iherve.com. He also maintains a web page full of articles, scripts, tips, techniques at: http://www.iherve.com.